How we built a block-based template editor for gamification emails
 Jason Louro
At the company I co-founded we recently released an interactive template editor for gamification emails (things like achievement notifications, weekly usage recaps, and re-engagement emails after periods of inactivity).
The initial goal was to basically implement a Notion-style document editor, but things got complex pretty quickly...
This post breaks down the different approaches we considered, where we ended up, and why we made the decisions we did.
Goals & Potential Approaches
We knew from the start that we wanted our template editor to have the following attributes:
- Easy to use, even for non-technical users
- Extensible so we can easily add more new block types over time
- Low-maintenance (not too many dependencies, not prone to those small-but-impossible-to-debug issues that can be the bane of engineers’ existence)
- Dynamic, with support for embedded variables and conditional rendering
We considered the following approaches.
Raw HTML + Handlebars With Previewer
SendGrid uses this approach in their dynamic templates feature:

If we went this route, our emails would be able to contain pretty much anything, since users would have control over HTML, and something like Handlebars is powerful enough to do all sorts of conditional rendering and variable insertion.
The obvious downside is that this is quite complicated for non-technical users (potentially disqualifying) and a high barrier to entry even for technical users, since it takes a long time to get a nice looking email out of raw HTML.
A template library could help with this, but there’d still be more work involved in adapting a template to fit a company’s exact needs and brand.
Block-Based With Previewer
Prismic uses this approach for their marketing page editor:

The goal here is to have a set of reusable blocks that can be added and reordered on the page. The blocks are not WYSIWYG, so they can contain form fields and other controls. To see the end result, users must use the preview tool.
Text fields within blocks could support rich text using TipTap and variable insertion via Mustache or Handlebars, and there could be a “Conditional” block type to support conditional rendering of blocks depending on those variables.
The main advantage of an approach like this over raw HTML is that it lowers the barrier to entry drastically. Users no longer need to fiddle with HTML and CSS, nor do they need to know the intricacies of handlebars for conditional rendering. They just need to be able to drag/drop blocks around and understand the {{variableName}} syntax.
But, this approach is slightly less powerful than raw HTML and still requires a previewer tool to see how the email would actually look to its recipients.
Notion-Style Blocks (WYSIWYG)
This style is all the rage these days.

This approach maintains the advantages of the regular block-based approach, but loses the need for a previewer, since blocks display exactly as they would to recipients. The user can simply place the cursor into a block and start typing to make changes.
The main downside here is specific to our use case: we really need to support conditional rendering of blocks, and it’s unclear how that could work in a design like Notion’s.
Experimentation
I started out with the Notion-style approach, using TipTap’s Notion-style editor template. The entire system of blocks was within the scope of TipTap, meaning the entire email template editor was the rich text editor.
Every block was a TipTap node and the user could navigate through the document using the arrow keys or clicking around to different areas.
This got clunky very fast, for a couple of reasons:
- We needed block types that had their own text fields within them. That means we needed blocks to have an “edit state”, where when selected they’d no longer be WYSIWYG.
This sort of view & edit state at the block level does not work well within TipTap since we’d have to deal with the cursor navigating in and out of these, and text selection (can the user click & drag to highlight text from multiple blocks, even when one is in the edit state?). - Conditional blocks, as previously mentioned. There was no elegant way to get conditional rendering trees to look & feel good within a Notion-style editor.
We did however like the feel of being able to click into text and use a TipTap-powered rich text experience for italicizing, bolding, and inserting variables using Mustache syntax. TipTap is extensible enough to add things like dynamic menus that appear when you type {{, showing the plain-English variable names.
So rather than throwing this out completely and trying out the block-based approach with a previewer, we figured a hybrid approach would be worth a shot.
Specifically I tried the following:
- Get rid of TipTap as the manager of the blocks, and instead only use it for rich text fields within blocks.
- Create our own simple React component for managing the blocks.
- Have a selection state so users can select one block on the page at a time. The selected block is displayed in an edit mode that shows the block’s fields and controls. All other blocks remain in view mode which is fully WYSIWYG.
This approach worked!
It allowed us to keep the user-friendliness of the Notion-style editor, but still support dynamic rendering (through a “Conditional” block that shows all conditional paths when in edit mode but only one when in view mode) and having multiple fields within each block. Here’s what the editor looks like in practice:

And that conditional block I mentioned looks like this while being edited:

Fleshing Out the Editor
Once we’d settled on the approach it was just a matter of building out all the block types and handling variables correctly. There are a couple interesting bits that I’ll note here.
Variable Insertion
We went with Mustache as it’s the simplest template language with basically zero logic. We want these email templates to use Conditional Blocks for logic—the text editor only needs to support rendering variables.
To add Mustache to TipTap I wrote a custom extension, which also renders this nice dropdown menu with the available variables:

I added a preview pane on the right-hand side where users can edit the preview variables used by Mustache to populate the template.
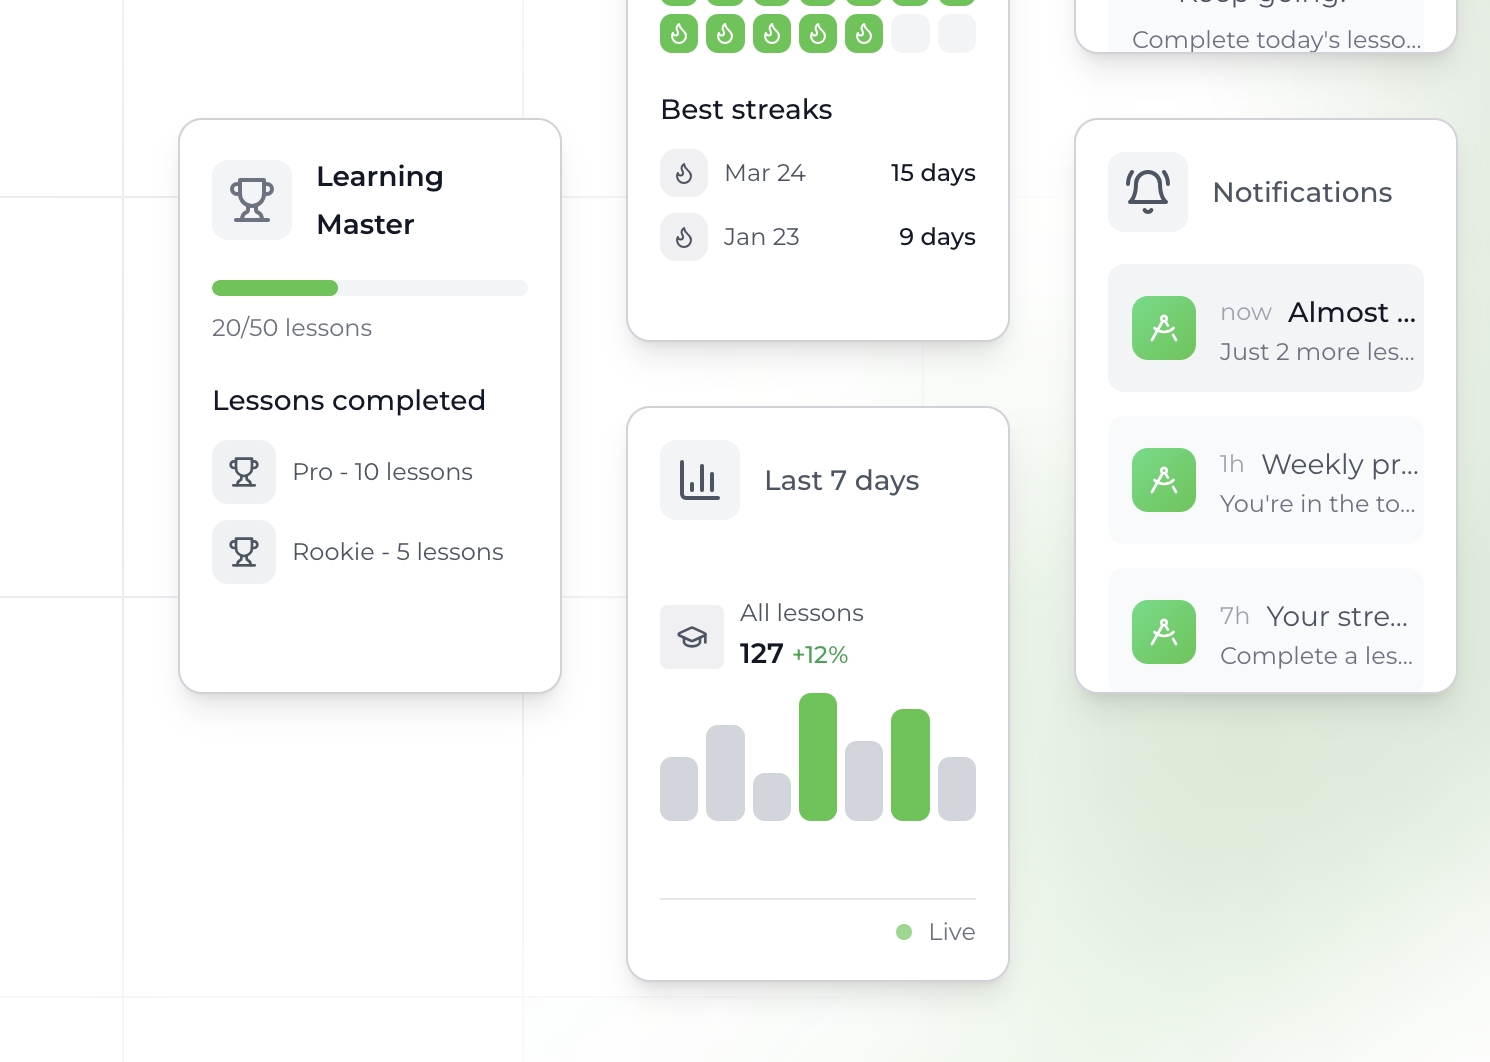
Adding "Smart" Blocks
The email editor needed to support blocks powered by Trophy that you don’t find in other, more generic email template systems. So far we’ve added:
Achievement progress charts: Shows a user’s progress toward a set of related achievements.

Achievement unlocked: Shows an achievement that the user just unlocked.

Metric progress chart: Shows a user’s progress over time on a particular metric.

Streak: Shows the user’s current streak (if any).

Takeaways
I learned quite a lot from this!
First and foremost: the Notion editor style isn’t for everyone. I think we just assumed that it would work by default, but different types of editors really do require different UX.
Aside from that, I must say that TipTap is getting better and better; I can’t imagine starting a new project in 2025 and going with a different solution for rich text editing.
Detailed docs on the template editor and how it works are available here.
Trophy is gamification infrastructure that retains users.
Gamification infrastructure that retains users.
Gamification APIs for web and mobile
Free up to 100 users. No CC required.
Try Trophy for free.